Tuesday, May 29, 2012

FUN PINWHEEL CRAFT

This patriotic pinwheel was a fun craft we found on the Disney Family website. Of course my OCD nature came out just a little, but we figured out a way to do these pretty easy and very cheap!

You can find the craft on the Disney Family website by clicking here, or you can go straight to the PDF that you need to print off by clicking here.

Note: Our instructions do vary some from the ones printed on the PDF, as we wanted it to be more durable and spin freely.

Here is a list of supplies you'll need:
  • printed PDF image of the pinwheel - cardstock will be stiffer, but plain copy paper also works
  • wooden dowel - 3/8" inch diameter and cut to 12 to 15 inches long.
  • lollipop sticks (you can find these in the cake decorating section of the craft store)
  • 2 eyelets each, in two sizes - 1/8" (4 mm) and 3/16" (5 mm)
  • glue - Elmer's or craft glue
  • scissors
  • pliers - wire pliers or regular pliers
  • eyelet setter/hole punch
  • hand drill with 5/32 bit (or regular drill)

- First, print the PDF images, and then fold in half and glue as shown below. We used a spray adhesive; it works really well. But Elmer's or any craft glue works.

Note: You may also want to spray the page with a fixative before folding it to keep the ink from running.


- Next, cut on the dotted lines on the character side, only to the end of the line. Don't cut all the way to the center.


- Next, use an eyelet setter/hole punch to punch a hole in the center. The hole needs to be large enough for the 5 mm (3/16) eyelet.

- Then, using the same 3/16 hole punch, punch a hole in each of the four corners. Be sure to stay to the left hand side of the cut you made in the paper each time.


Note: This pinwheel pattern in actually reversible. If you start with the the stars and stripes side of the paper (visible in the picture below), it would yield a reversed looking pinwheel in the end.

- Whichever side you choose, place the eyelet in the hole of the first tab.


- Next, the pull the tab directly opposite of the first one onto the eyelet.


- Pull in the other two tabs onto the eyelet. When you are done, the eyelet should be punched through all four tabs.


- Setting the eyelet is the hardest part of this project. We found this cone tip worked the best.


The only way we found was to set the eyelet through the hole on the back of the pinwheel. Don't set the eylet too tight, though. It needs a little bit of wiggle room so you can rearrange the points on the front to look good. (I'm OCD - what can I say?)


- Now place your second 3/16 eyelet through the back and set it through the inside of the pinwheel. It's a little awkward, but doable.


The finished paper portion of the pinwheel should look like this:


- Next, you need to drill a hole through the end of the dowel. Choose a drill bit that is the same diameter as the lollipop stick (about 5/32), and drill all the way through the end of the dowel.


- Next, take the lollipop stick and place an 1/8 inch eyelet on the end, with the finished side of the eyelet facing the middle of the stick.


- Secure the lollipop stick in the drilled hole with some craft glue and then press the eyelet down into the glue as well.


- Now place your pinwheel into its proper position and feed your last eyelet onto the lollipop stick,  with the finished side facing out.


- Test the pinwheel to make sure it can spin freely. You'll want to position the eyelet on the lollipop stick so that there is at least 1 1/8" inches of the stick visible. Then trim the excess lollipop stick off and you are left with this:


- Now you need to crimp the eyelet. We used cheap wire crimpers, but even a good pair of needle nose pliers would work. All you are aiming for is crimping the edge of the eyelet that is closest to the paper pinwheel. You only need to squeeze with light pressure, then turn 90 degrees and squeeze again to round the eyelet back out.


And if you are super OCD like me, you color the end of the stick with a black Sharpie, or the same color as whatever the color of the eyelet is. :)


Congratulations! You have a pinwheel that will hold up to a little wear and tear, and it spins freely with even the slightest breeze!


Sunday, May 27, 2012

3D PHOTO EFFECT

This post is for all you paper scrappers out there. We helped Kendra with her exhibit for her history fair project, and it turned out so cool that we just had to post about it.

Isn't she so cute?! :)


She wanted to make a display board and diorama for the fair. Due to our time constraints, we had to make her choose one or the other. With a little compromise, we figured out how to get the best of both worlds. We focused on the pictures and decided to try a 3D effect on them.

The picture below is taken with the camera pointing directly at the photo. The 3D effect was done to the three boys in the center of the photo. It is hard to tell from this angle and through a camera, but with the naked eye, stacking the images gives a haunting effect to this photo.


We took this next photo on an angle, and you can better see the stacked images. First, we started with three copies of the exact same photo - the same size, color, etc. The first one was laid down on a mat, the second cropped very carefully down to just the three boys in the middle, and the last photo was cropped down to just the boy in the center.


This is another shot looking at the side of the stacked photos. They are spaced apart using pieces of craft foam and attached with glue dots.


We put down the cutting of the three boys together first, directly on top of where they are in the bottom photo. Next, the cutting of the single boy in the center goes again directly on top of his picture in the lower cutting. Now you have a photo that just doesn't tell a story, it makes a statement!


We liked the effect so much on the first photo that we helped Kendra add the same effect to all the photos on her board. Her project was about child labor laws and making these photos three dimensional just made them seem to jump out of the paper and shout, "LISTEN TO MY STORY!"


This 3D effect works well on buildings, too. The Utah State Capitol building shown here has four levels of stacked images, and it looks very cool!


This is a color photo using this technique. It was used on the images of the three children sitting on the right hand side.


In this image, the two children in the front row of the class are 3D.


This project was really fun! Kendra's exhibit even went on to the regional level of the competition. As we were working on this project, we thought this effect would be really cool applied to scrapbook pages. Enjoy and scrap on ... or what ever you ladies say to each other when you're scrapping!

Friday, May 25, 2012

PATRIOTIC DOOR WREATH


After looking long and hard for a fun Fourth of July themed wreath for our front door, and not finding something we liked, we decided to make our own.  We started with a customized grapevine wreath arrangement that was on clearance at Michael's for around $30. It had white flowers and greenery around the bottom and left side. Next, we picked up 3 red silk roses, 3 blue silk hydrangeas, and 2 American Flags.

To assemble it, we hot glued the flowers in place, intermixing the red and blue ones into the white flowers and greenery that were already on the wreath. Then we hot glued the two flags on, criss-crossing the dowels. Our final result is in the picture below. It was a quick and easy project that we did for around $45, still less expensive than a custom arrangement and also less than buying all of the materials separately.


DISNEYLAND PINS


This idea came from Disney and their ever popular trading pins that you can buy in the theme parks. Last year, we took our daughter Kendra on a surprise trip to Disneyland - code name "Black Ops Mickey". We drove from Salt Lake on a ruse that we were taking the "scenic route" to see my mom in St. George, Utah. Yes, it was a stretch, but she was nine and we thought she would be totally clueless. We made it to Barstow before our way-too-smart girl pulled out the atlas and figured out on her own where we were. She says, "Well, if we are in California, then we might as well go to Disneyland!" AHHH, BUSTED! So, we ended up popping the surprise on her in a parking lot in Barstow, California. We were expecting her to go just crazy with excitement, what we got was ... nothing, just crickets.... She just sat there speechless, didn't utter a single word. Sigh - so much for video taping the excitement...

Now, the pins came about for two reasons. One, we wanted to be able to give her some pins put on her lanyard without paying $10 to $15 per pin (OUCH!). Second, we were worried that she would be too scared to ride a lot of the "big kid" rides. So, we made one pin for every ride in the parks, both the Magic Kingdom and California Adventure. And yes, we even made them for the kiddie rides, too. When she went on the ride, she got her "badge of courage" for that ride. We also made others that were just collections of pins. She LOVED this and she fearlessly went on every single ride in both parks, including my personal favorite, the Tower of Terror. In fact, the pins ended up becoming ways for her talk to other kids in line. She started giving them away to kids who saw one that they really liked. We even gave one to a ride operator who was the single best ride operator ever for the Tower of Terror.

The very best part though, was watching my daughter give the first couple of pins away. This little idea to help my daughter be brave turned into "who can we make smile by giving them a pin". Soon all three of us were hunting for people that looked like they could use a pin. I could not be more proud as a parent.

How did we make all the pins, you ask? Here are the steps we used, although we found more and more ways to be creative with this project as we really got into it. Our inspiration came from from the beloved grape soda bottle cap pin that Ellie first gives to Carl, and that Carl in turn gives to Russell in the Disney/Pixar movie "Up".

The hardest part was searching the Internet for images that could be used the make pins for each ride. Not every image looks great on a 1 inch disk of paper, so there was a lot of trial and error. Luckily, my wife is pretty good with Photoshop and she created a layer template that aided in this process. Once we narrowed our images down to the ones we wanted to use, we gathered them all together on one page to be printed out. If you'd like to see our finished works you can view them here: Disney1 and Disney2. They are in PDF format and will download from My Google Documents.

**Please note the graphic sheets have been made to view only, in order to protect the copyrights for all of the images we used. We did not intend for these pins to ever be sold; it was simply a craft project for our own use. If there are any graphics you really enjoy, I am sure we can retrace the billion sites we searched to help you find it.**

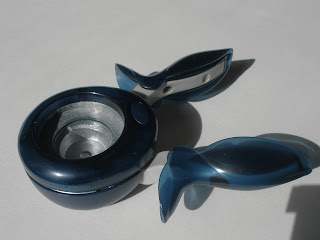
Next, we found a great site for blank bottle caps, http://www.bottlecapco.com . They had the best deals on bottle caps, You can order 100 chrome bottle caps for about $5. Compared to what they are going for in the local craft stores, that is a huge bargain! Also on the same website, we ordered the 1 inch epoxy dots, 100 for $14, a 1/16" metal hole punch for $18, and finally, E-6000 glue for $7.  These prices are accurate as of May 2012.)

For the last tool, we went to the local craft store, Jo-Ann, and used a 40% off coupon to purchase a Fiskars brand 1" hole punch. We already had a Martha Stewart brand punch, but found we actually preferred using the Fiskars one; it was easier to line up with the images.
Assembly:

Here's how we assembled the pins:

- Print the images and spray them front and back fairly heavy with a fixative.

- Punch out the images using the 1" paper punch.

- Place an epoxy dot on top of each cut out image. Work the air bubbles out until image looks clear.

* A small note before moving on about the E-6000 glue. Once you open the tube, it wants to continually ooze, so keep something under it to protect your surface. You have about 1 or 2 minutes to work with it before the glue gets tacky and you can no longer move your image on the gluing surface, so you may want to get 2 or 3 going at a time.

- Place a very small amount of E-6000 glue on the bottle cap.

- Place your now combined image and dot on top of the glue, then push the image around in a circular motion in order to spread the glue evenly across the bottom side of the image. Center the image on the cap and let it stand for about a minute.

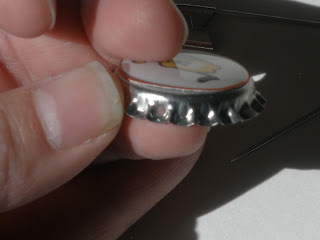
- Once the glue has started to become tacky, carefully press down around the edges of the image and ensure the image has attached all the way around the cap.

When you are done, your cap should look something like this:


- Next, take the 1/16" metal punch and punch a hole on each side of the bottle cap.


- Then take a 2" safety pin and thread it through the holes you just made, and there you have it, an awesome bottle cap pin!


My mom, who loves to bead and make bracelets, even added some flair to a couple. Below you can see one where she simply added some cord which was then macramed into a bracelet.


Here she used the 1/16"punch all the way around the bottle cap and beaded some green beads through the holes. It is also still possible to get the 2" safety pin through the holes as well.


The Disney Princess Cuties were a massive hit with the girls in the park. We gave several of these away:


Here are some more Disney Cuties of Mickey and Minne and Pluto, as well as the only remaining Disney Fairy pin my daughter did not give away.


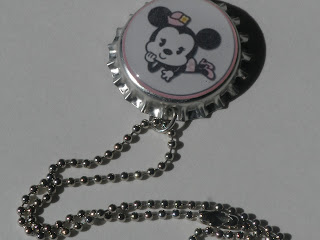
This was a different idea for wearing them we put a single jump ring through the cap and attached a simple, inexpensive ball chain.


This is the bottom side of a a ring attachment you can see the top side of this ring in the image above with the Mickey Cutie on it.

These were really fun to make and ended up being a memorable part of our vacation!